

Ok, ok, I am a little bit of a geek… But in my defense at least I have started kicking around with Artificial Intelligence and not just ChatGPT! This month, I wish to dip my toes into the icy, cold waters of AI and show you what you can do in Db2 13 right out-of-the-box !
What’s in a BiF?
Db2 13 FL500 brings three new Scalar BIFs. These are the SQL Data Insights functions. They come supplied with Db2 13 but you do have to install a bunch of stuff to actually get them working (so not really out-of-the-box, but close!)
Five Easy Steps?
First, you need to make sure you have all the prereqs in place. These are basically a couple of APARs for the IBM Z Deep Neural Network Library (zDNN), the z/OS Supervisor, IBM OpenBLAS, z/OS OpenSSH and IBM 64-bit SDK for z/OS Java. zDNN and OpenBLAS come with z/OS 2.4/2.5, but without the required APARs the libraries may be empty.
SQL Data Insights (SQL DI) is a kind of no-charge add-on to Db2 13, so you need to order and install it separately (FMID HDBDD18).
All the prereqs are listed in the Db2 docu: Preparing SQL Data Insights installation
Now the Install
Then you need to install and customize SQL DI, starting with the definition of a (technical) user along with its appropriate authorization (Configuring setup user ID for SQL Data Insights). They’re asking for 100 GB of storage for the zFS home directory, but I think you’ll only need that when you start to run AI model training on vast amounts of data. For my first tiny steps into the world of Db2 AI it worked with a tenth of that without any problems. It may well change with my soon upcoming tests! The requirements listed for CPU and system memory aren’t much smaller and I’m experiencing a very measurable CPU consumption whenever the model training on an object starts.
RACF for Advanced Users!
The next step (Configuring user authentication for SQL Data Insights) is very likely a task for your RACF colleague, unless you have RACF SPECIAL authority (Who on earth *ever* has SPECIAL these days … any auditor would throw a right royal wobbly there!) or sufficient authority as described in RACDCERT command. RACDCERT manages RACF digital certificates and SQL DI needs that to allow secure (https) connections to the user interface, coming as an easy-to-use web application.
While You are Waiting, Sir…
While your RACF colleague is getting the (technical) user and the certificate in place, you can sneak into Db2’s SDSNSAMP lib to customize and execute DSNTIJAI. This guy creates the required database and pseudo-catalog tables as described in Configuring Db2 for SQL Data Insights. There are also GRANTs in the sample job, but I had to add another one for procedure DSNWLM_UTILS, since SQL DI uses that for LOAD.
And We are Finished!
Finally, you must do the SMP/E installation of SQL DI, followed by executing the installation script in the USS environment as described in Installing and configuring SQL Data Insights. USS scripts seem to be (along with certificates) the fun part of installing products these days. Carefully plan, and stick with, the values that you enter during the interactive installation of the sqldi.sh script. If you re-run the installation, for example, and decide for another SQLDI_HOME, your .profile will have a # Generated by SQL Data Insights installation script section that will not be updated. The script also starts SQL DI and SPARK (needed and installed by SQL DI). However, there seem to be some very low internal timeout values set for verifying the successful start – at least in my environment. The script complained that start failed, but it was all up and running fine. After you verified the successful installation as described at Verifying the installation and configuration of SQL Data Insights, you can start having fun with SQL DI. I, however, decided to additionally go for the optional step Creating a started task for the SQL Data Insights application. If you intend to use SQL DI more than once, and maybe have your colleagues also work with it, I think this piece is a must. Be aware that there are a couple of adjustments to make it work:
- The sample STDENV, as well as the samples that are in the SQLDAPPS STC sample job don’t have all the definitions of the .profile sample, which I added manually.
- The AI model training failed, complaining that zade wasn’t found in java.library.path and I was only able to fix that by manually setting additional environment variables as described in IBM Z Artificial Intelligence Data Embedding Library environment
- The _CEE_RUNOPTS=“…“ sample didn’t work for me and I had to remove the quotation marks to make it look like _CEE_RUNOPTS=FILETAG(AUTOCVT,AUTOTAG) POSIX(ON)
- Starting/Stopping SQLDAPPS using SQLDAPPS sample job triggers sqldi.sh with the start/stop option. This is accomplished by two members in the PDS specified by the STDPARM DD card. The STOP is issued by command /s SQLDAPPS,OPTION=’SQLDSTOP‘ (for what ever reason not by STOP SQLDAPPS) and correctly refers to member SQLDSTOP. The START is issued by command /s SQLDAPPS,OPTION=’STRT‘. However, the member is actually called SQLDSTRT, so it either requires to change the STCs sample job default option to SQLDSTRT, or the member to be renamed as STRT.
There is also an optional step to create an STC for the SPARK cluster in the docu (Creating started tasks for the Spark cluster). Short story: Skip it, because SQL DI will start the SPARK cluster (master and worker) automatically anyways.
Here is a link containing a really good overview:
Up and Running?
Once installed and ok, you can then kick off the web interface. The first page is a login panel of course:
Time to get Connected
Here you can see that I have already defined my little test Db2 13 to the system:
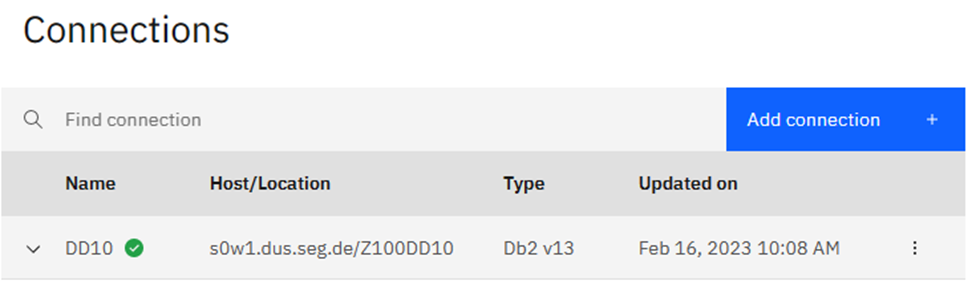
If you click on “Add connection” you get a pop-up to define how to get to another Db2 using a certificate or a userid and password, very similar to setting up a Data Studio connection. Click on the three dots and you get a drop-down box:

Here you can disconnect, Edit (Which shows you the same window as “add connection”), List AI objects or Delete.
Starting to Feel Intelligent!
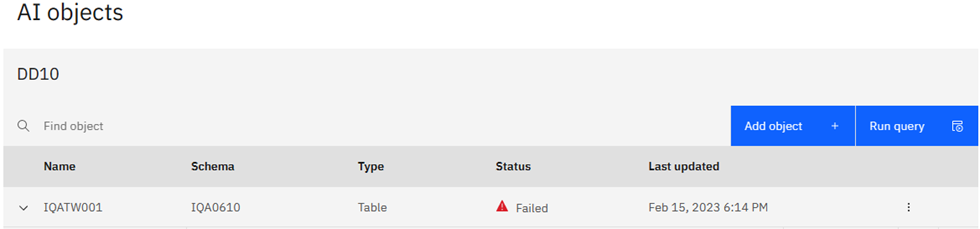
Choosing List AI objects you see what I have created:
I’m Sorry, Dave, I’m Afraid I can’t do That.
Sadly, it failed – Click on the downward arrow expands the view:
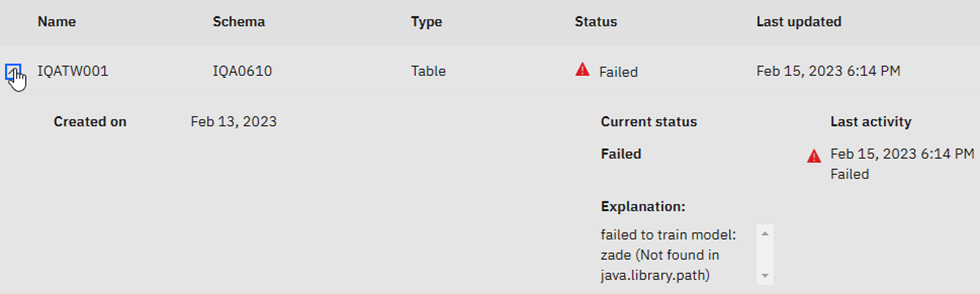
When I first heard “zade” I thought of Sade – “Smooth Operator” for some reason…The explanation is actually a hint that something is wrong with the JAVA definitions. It could be a classpath problem or a version problem. This is in work as I write this!
Can you hear me, HAL?

Now the Enable AI query I will cover later, first Analyze data takes you to the next window:

Just the Facts, Ma’am
Click on Data statistics for a different view:

Column influence:
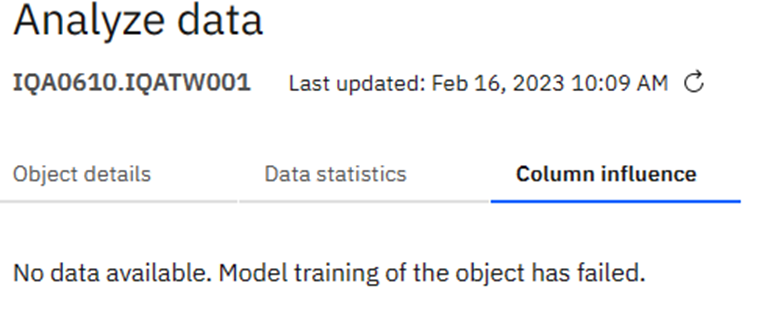
Has no function yet as the training failed…
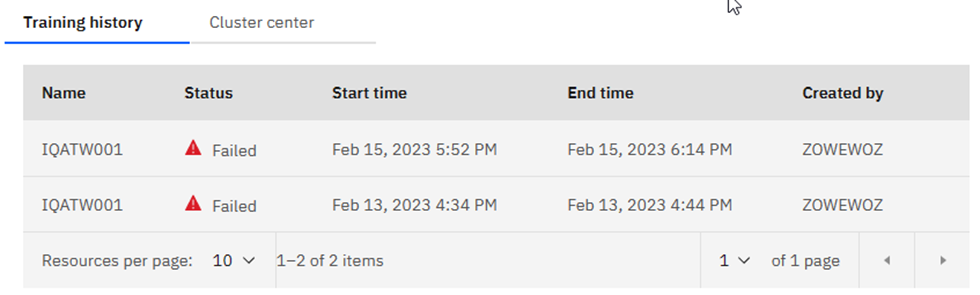
An Overview is Good
Selecting View model shows you the history of this model:
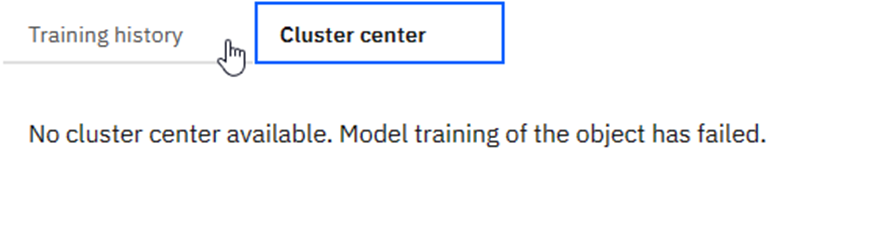
Naturally, Cluster center shows this:
Is There an Export Limit?
Export Columns creates a JSON file:

Which then looks like:

Pretty horrible if you ask me!
Skipping back to HAL
Going back to the List AI Objects window, there are two blue buttons: Add object and Run query.
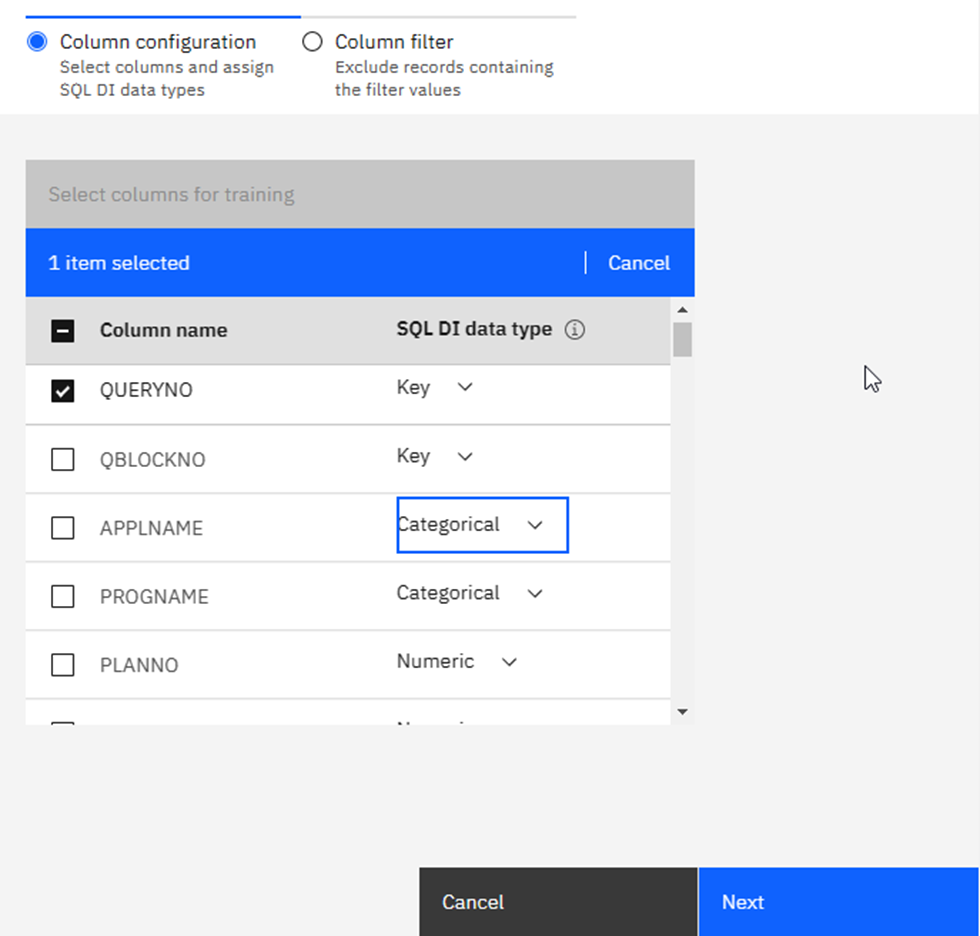
Add Object is how I added my first table, it is basically a catalog browser where you can pick the table of choice and, once selected, the greyed-out boxes at the bottom turn blue and you may click on Add object or Enable AI query. Having added a table you then do indeed click on Enable AI query to decide which columns have which DI data type. This is the most critical moment in the whole process!

When you select a column, you can decide on a data type:
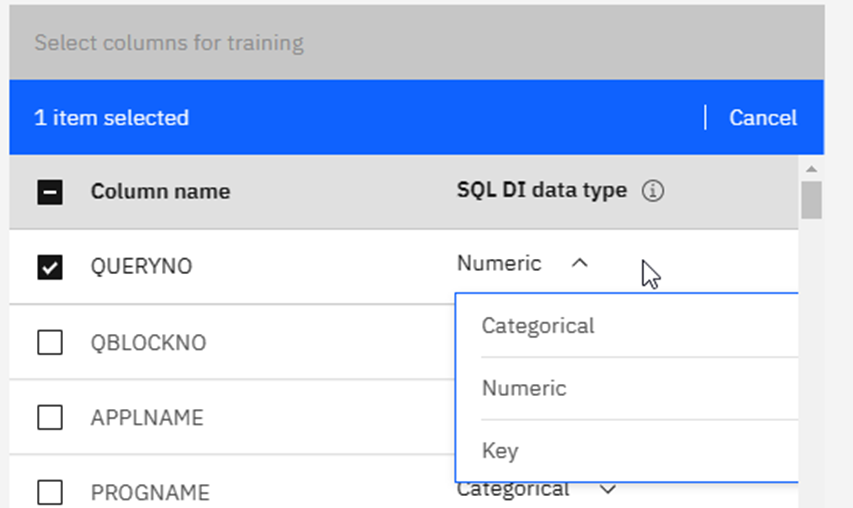
Categorical, Numeric or Key. Once you have decided this for all of the columns click on Next:
Here you get the Filter chance:

Last Chance to Turn Back…
Now you have the choice to filter again or just click on Enable:
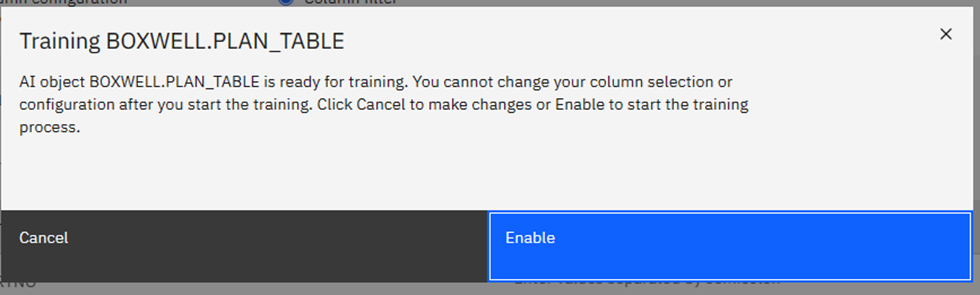
This now kicks off an Apache Spark process in the background that sucks all of the CPU and memory from your system for a while and builds a new vector table in the background. The vector table actually contains the model data to be used by the new BiFs.
In SPUFI you can find your vector table:
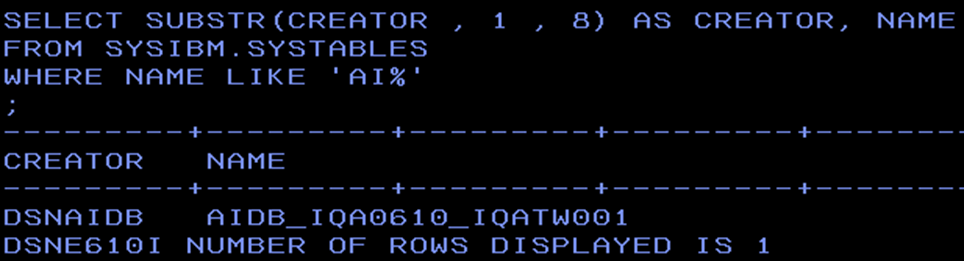
It is “AIDB_” concatenated with your table creator an underscore and then table name.

There are only three columns and, naturally, due to the failure of the model training, my vector table is empty… The COLUMN_NAME here is the column name that is referred to from now on in this blog.
Round up the Usual Suspects!
The vector data tables are very, very special… you cannot simply copy them between systems like normal data and you must make sure they stay in step with their partner “real data” tables – and here I specifically mean image copies!
Once a model is trained, you can use the new BiFs. The documentation is a bit sparse and it does not explicitly say you can use numeric data types, but it also does not explicitly say you cannot! In fact, the list of “cannot use types” are always the same:
BINARY, VARBINARY, CLOB, BLOB, DBCLOB, XML or ROWID.
Maximum length of the used column is 1868 Bytes.
Where’s the Beef?
Here are the currently available AI BiFs with examples taken from the docu.
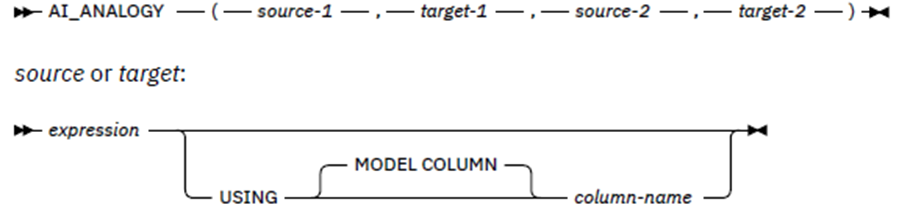
This is the human language equivalent of Source-1 is to Target-1 as Source-2 is to Target-2.
The Column Name is the identifier which points to the model and column name to be used for this AI function (COLUMN_NAME in the vector table) and, if not given, then the expression determines the column name or it is just the actual table column name. The model specified must, obviously, be the same for both Sources and the same for both Targets.
Here’s an example showing the syntax:
The customer with ID ‘1066_JKSGK’ has churned. Given the relationship of that customer to ‘YES’ in the churn column, find customers with the same relationship to ‘NO’ in the churn column, in other words, customers unlikely to churn.
SELECT AI_ANALOGY('YES' USING MODEL COLUMN CHURN,
'1066_JKSGK' USING MODEL COLUMN CUSTOMERID,
'NO' USING MODEL COLUMN CHURN,
CUSTOMERID),
CHURN.*
FROM CHURN
ORDER BY 1 DESC
FETCH FIRST 5 ROWS ONLY ;
The result is a double precision floating point number. The larger the positive value the better the analogy and a value of -1 is a poor analogy. Caution must be used as the result can also be NULL if any of the args are NULL.
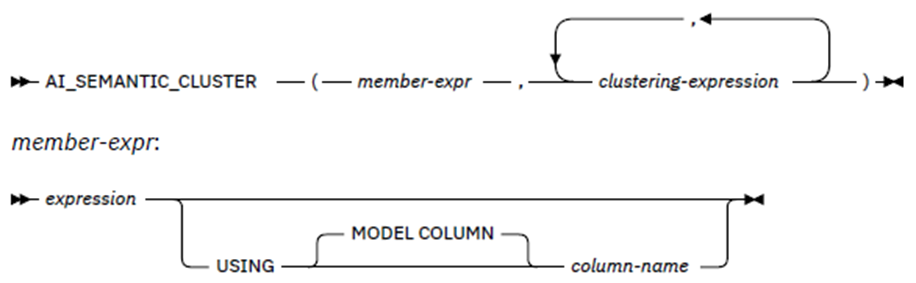
This returns a clustering score for the member-expr value among the cluster of values defined in the, up to three times repeated, clustering expression list. Like AI_ANALOGY the model to be used is either the member-expr column name or the explicit column name.
Here’s an example showing the syntax:
Customers with IDs ‚0280_XJGEX‘, ‚6467_CHFZW‘ and ‚0093_XWZFY‘ have all churned. If we form a semantic cluster of those three customers, find the top 5 customers that would belong in that cluster.
SELECT AI_SEMANTIC_CLUSTER(CUSTOMERID,
'0280_XJGEX', '6467_CHFZW', '0093_XWZFY'),
CHURN.*
FROM CHURN
ORDER BY 1 DESC
FETCH FIRST 5 ROWS ONLY ;
The result is a double precision floating point number between -1.0 and +1.0 that is the semantic clustering score. A larger positive number indicates a better clustering among the list of clusters. Caution must be used, as the result can also be NULL if any of the arguments are NULL or were not seen during training.
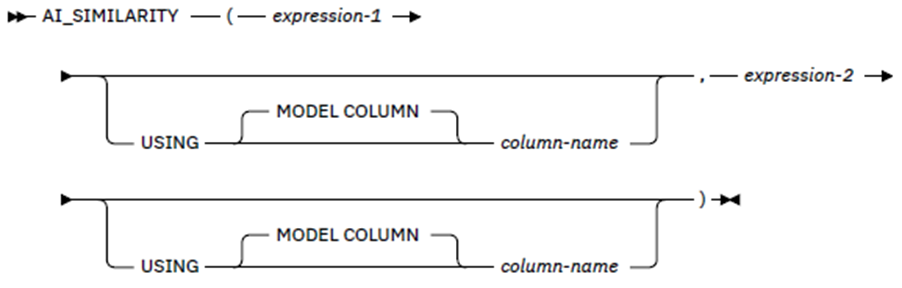
This returns a similarity score for the two expressions. Like AI_ANALOGY, the model to be used is either the expression column or the explicit column name.
Here are two examples showing the syntax:
Find the top five customers by ID most similar to the customer with ID ‚3668-QPYBK‘.
SELECT AI_SIMILARITY(CUSTOMERID,
'3668-QPYBK'),
CHURN.*
FROM CHURN
ORDER BY 1 DESC
FETCH FIRST 5 ROWS ONLY;
Find the top three payment methods most similar to ‚YES‘ in the CHURN column.
SELECT DISTINCT AI_SIMILARITY(PAYMENTMETHOD,
'YES' USING MODEL COLUMN CHURN),
PAYMENTMETHOD
FROM CHURN
ORDER BY 1 DESC
FETCH FIRST 3 ROWS ONLY ;
The result is a double-precision floating point number (FLOAT) that is the similarity score between -1.0 and 1.0, where -1.0 means that the values are least similar, and 1.0 means that they are most similar.
With this BiF you can get NULL returned if the columns of interest are numeric types but the value is outside of the range of FLOAT. Further, NULL is returned if any argument is NULL and also if the value was not available during training and the column is not numeric.
Follow the Money!
This is all you get out-of-the-box in Db2 13 – The real question is, „For which business use cases does it make sense to use these BiFs?“ That is naturally a very hard question and next month I hope to bring you real life AI examples from my test data (as long as I can get my Models trained!)
TTFN
Roy Boxwell